Sunday 26 December 2010

Boxing Day Challenge

It may be Boxing day, but it's also Sunday so of course we're here with another challenge for you. We hope that you're all having a lovely festive time and that your Christmas day was wonderful :) Today we have a little sketch for you. Perhaps you can print some of yesterday's photos out for this one, or perhaps find some photos that remind you of the summer if you're as cold as me and looking forward to spring!


This week our lovely Fabi has created a sketch for you. There are no criteria this week other than create something based on the sketch, and enjoy :)

And here's what the design team did with the sketch:

Anna:


I had great fun using Fabi's sketch with this layout. The sketch was a bit of a different style for me so I changed a couple of things to make it more me, that's the great thing about sketches! Love the layout I created, thanks Fabi! My little nephew drawing, with his long curly hair it made he look like a nutty professor!

Fabi:

I made a professional book and have lots of new and great pictures to scrap. This also helps me to get my mojo going on. Besides it, a sketch is also helpful so I loved to create this sketch and also join the challenge. Ok, my layout in the end is a bit different from my own sketch but i loved the result lol. A wonderful season time to you all. XX Fabi


Lisa:

Great sketch Fabi.

Nic: I loved this sketch - circular designs are always a firm favourite in my world. I created a page about a game of crazy golf we had whilst on our hols several years ago.

Tessa:


Valerie: Nothing like a great page sketch to make things easier! This page documents my son’s current obsession with drums. They are at the top of the Christmas list and while we were on vacation, he was delighted to find drums all over Disney. Love that the circle in this sketch echoes the shape of a drum.


Materials: cardstock: Bazzill; patterned paper: Basic Grey, Sassafras Lass; stickers: Basic Grey, 7 Gypsies; tabs: Basic Grey; stamps, jute: Studio Calico; frame: K & Co.; letters: American Crafts, Sassafras Lass; markers: Copic

And our wonderful Guest Designer with her final LO of the month, Julie Dix:


I loved this sketch so I've stayed fairly true to it, but I thought I'd use one long photo by trimming down a 5x7. I thought the gorgeous colours in these papers from the We R Memory Keepers 'Maple Grove' collection went really well with the photo - even though they're Autumn colours and the photo was taken in August!

Don't forget to stop by next weekend for the first challenge of 2011 x

Friday 24 December 2010

Quick and easy Christmas - last minute tags!


These tags will take you only minutes to knock up a whole batch!

What you'll need:

Some cardstock (I used Kraft)
Some 3D Christmas stickers (Dear Lizzie by American Crafts)
Some decorative tape, or if you don't have any, some strips of patterned paper would do. (Dear Lizzie by American Crafts)
A Christmas sentiment stamp
Double sided tape.


I started by trimming some 6"x3" pieces of cardstock - you'll get 8 tags per 12x12 sheet. I then folded these in half to create the bases for my tags.

I stuck down a strip of the decorative tape on each tag, and stamped my sentiment above it.

A dimensional sticker was then added for embellishment.


A strip of double sided tape on the back of each tag and tada! Your tags are complete :)

Quick and cute :)


Have a MERRY CHRISTMAS everyone!!!

Monday 20 December 2010

Quick and Easy Christmas place cards!

Today's quick and easy Christmas project comes to us from Anna!

Her idea is for brightening up the Festive Dinner table with place cards.

 I made my place cards from some plain white card. The size I made them was 7.5cm x 6cm but it is a good idea to check that your longest name fits on the card, if not you may need to make it longer or use smaller letters.
This is what you will need to make these: your piece of card cut to size fold in half and inked around the edges with red ink,  a piece of border in patterned paper, about half the size of you place card and cut along to top with decorative edge scissors or a border punch and inked around the edges,  a piece of gold ric rac the length of your card,  and a Christmas shape of some sort cut from patterned paper, I hand cut my own Christmas tree but you could used a punch or die cut to suit. The patterned paper I used was Crate Paper's Snow Day collection as I love the bright colours.
Once to have got the bits ready you can stick it all together, I over lapped my Christmas tree so it stands on the edge of the card and i added a little gold star to the top!
Then you can use any small letters of your choice, I used some by October Afternoon and that's it, how easy was that?!
They will add a lovely personal handmade touch to the Christmas dinner table. You could change the colours to match you dinner table and for a extra special touch you could even make napkin rings with the same card and paper to match!


Thanks for sharing, Anna!

Sunday 19 December 2010

Sunday Challenge: 19th December 2010

It's pretty snowy out there isn't it? So it's a great time to catch up on this month's challenges and get them uploaded with a link to the side bar on the right. Amanda's taken pity on us this week though in the run up to Christmas and given us a quick challenge.

I know that most people are ultra busy in the run up to Christmas, so this week your challenge is to take a photo of something that puts you in a Christmassy mood! Then, once all the festivities are over, you'll be able to go back and scrap the picture at your own leisure.

Here's a little look at what Christmas means to our design team:

Amanda:
I decided to share this picture of my son getting ready to decorate the tree. It's not perfect, and it's one of a string of about 30 pictures. None of them are any better. The thing I love is that the reason they're not perfect is because Lewis never stopped chattering throughout the whole lot. He gets so excited about decorating the tree, and his funny facial expression in the photo just reminds me of his excitement. :)

Anna:
Our local Christmas Market in Bath always puts me in the festive mood at the beginning of December. We have made it a bit of a tradition to go and see it one evening every December. I love all the Christmas smells there like chestnuts, Christmas spices and mulled wine and to see all the little sheds lit up, it can't help but make you feel Christmassy!

Fabi:
Its 2 years now that Im part of an amazing local group, our ScrapFriends Curitiba group.
We have circle journals and monthly crops and I have made very special friends, some like my sisters at this special group.
Every year we have our closing crop, actually, croc :)
This year was no different and we met today (4.12). Is also our tradition to take a picture of the group every year...so when we do this I always think about Xmas.
Its a signal its close and is usually the first party I have for season time.
That's why Ive choosen this picture for our 19/12 challenge.

Lisa:
For us, it doesn't get more Christmassy than this : )

Nic:
A tradition that signals both the arrival of Christmas and gives me my first Christmassy feelings is when I buy one of these to put on the mantelpiece:


Rebekah:

This year we went to see Father Christmas in LaplandUK. I have so many photos to scrap but my favourite is this one of Connor helping Mother Christmas decorate gingerbread men. Scrapbooking has turned me in to a bit of a freak! Every room I walked in to at LaplandUK I practically ran to get the best lit area. You've all been there though, right?? And I love the light in this photo.

Tessa:

Nothing signals the holidays like mandarin oranges. Growing up in snowy Utah, I would look forward to the boxes of mandarins that my grandparents would send at Christmastime from sunny California. Now that I live in California, I look forward to the cold weather that ripens the mandarins so that I can fill our home with the scent of oranges. Call me crazy, but I'd rather have one of these than a Christmas cookie any day!

Valerie:
This ornament belonged to my paternal grandmother, who I never met. I have have protected this ornament for years as it is the only one we have from her. It used to be on my mom's tree, and she passed it along to me. When it comes out of it's wrapping it always makes me smile, and definitely recharges my Christmas spirit!

and our GDT Julie Dix:

If I'm not already feeling Christmassy then I can guarantee that wrapping presents will always get me in the mood. To me, there's nothing better than a pile of beautifully wrapped presents under the tree, and so I surround myself every year with gorgeous paper, bows and curling ribbon - I love it!

*****REMINDER*****

Don't forget to get your entries in before midnight tomorrow for the DT call! Details here!

Friday 17 December 2010

Christmas Quick and Easy with Laurel Seabrook

Today's guest bringing us the next quick and easy project is Laurel Seabrook. Laurel is sharing with us some decor ideas using wooden blocks. Aren't they wonderful?


For all of the projects I painted the the blocks with acrylic paint and distressed if needed to. I then covered with paper, ribbon and embellishments. The letters are cut with the Cricut (Plantin Schoolbook) and the words with the Slice (Mistletoe).


Thanks for sharing with us, Laurel!

Only a week until Christmas eve! Is everyone ready?!

See you in a couple of days :)

Monday 13 December 2010

Quick and Easy Christmas Baking from Valerie Mangan

OK, so Val always blows me away with her baking projects. This is no exception! Thank you, Val!

For me, the holidays are all about baking. Baking, and giving baked goods away! Today I’ve got one of my favorite recipes to share. I love this recipe for several reasons: reason number one is that it is so, so easy to make. Reason number two is that it is irresistibly delicious! (I can only make this stuff at the holidays because I cannot be trusted around it!) The recipe, which you can find right here, is more of a confection than a cookie – it’s called Cracker Toffee (aka saltine toffee) because of its main ingredient: the saltine cracker. Check out the recipe right here and make a batch – see for yourself! It won’t last long, and the lucky recipients of this yummy treat will be very grateful, I promise!!

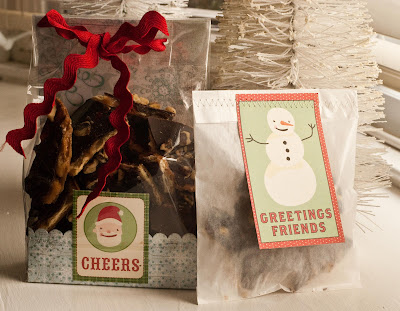
And while you’re at it, why not put together some cute packaging? Here are a couple of ideas I came up with to inspire you:

On the right: a simple gusseted cellophane bag with a panel of patterned paper. I backed the panel with another sheet of coordinating patterned paper, scored and folded in to fit into the bottom panel of the bag, and stitched a line across the front. Then I added the Santa card & a ric rac tie. On the right: a 4 x 5 glassine envelope - filled then zig zag stitched closed with a simple tag. Easy!!

Enjoy – and Happy Holidays!

Sunday 12 December 2010

Sunday Challenge: 12th December 2010

Good Morning! This challenge will put you ahead with your Christmas preparations, so you have no excuse not to play along!

This week we challenge you to create a Thank You card. Ideally, it should be geared towards christmas, but if you don't celebrate the Holiday or have another pressing 'Thank You' to send, feel free to change it up!

Guest Designer Julie Dix:


I'm not really a cardmaker so this was a really difficult challenge for me, until I decided to approach the card as a mini layout, albeit without a photo. I went with a Christmas theme and used Echo Park 'Merry Christmas' papers, but thought I'd keep it quite informal by saying thank you in a slightly more relaxed way!

Amanda:


Anna:
I like this challenge as it made me make another card that was on my list! I used my favourite October Afternoon 'Very Merry' Christmas papers.

Fabi:

Hey girls...here my card for our challenge for the 12th.
Actually Im becoming more and more interested in making cards...they are quick to make, great to show our appreciation to those we like, etc.
I mean, there are many reasons also to scrapbook cards, not only layouts, and Im enjoyed this challenge a lot.
Ive tried to make a vintage like card, hope you like it :)

Rebekah:
The butchers at the farm shop where we buy our turkey really makes an effort to get in to the Christmas spirit on probably his busiest day of the year when everyone picks up their preordered turkeys. I made a thank you card for him. He does, after all, sell really tasty turkeys :)


Tessa:
I made this card for my boys' music teacher. She did a fabulous job with their winter concerts and I wanted her know how much she is appreciated. I fashioned vintage sheet music that I painted with Twinkling H2O's into garlands and added a simple sticker sentiment. After finishing the card I knew it needed an envelope to match and made another little banner.


Valerie:
When I first started scrapbooking I couldn't imagine making cards. My advice to anyone who feels the same way: approach them like a tiny layout. It takes the pressure off!
I still use that tactic every now and then.This patterned paper is not a holiday paper but I think the addition of the snowflakes and metallic accents make it festive. It could easily be used all winter long.
materials: metallic cardstock: American Crafts; patterned paper: House of 3; frame: Maya Road; mist: Tattered Angels; stamps: Studio Calico, Practicing Creativity; snowflakes: Doodlebug; bling: Queen & Co.; string: Martha Stewart; embossing powder: Close To My Heart

Saturday 11 December 2010

Christmas Quick and Easy from Suzanne Spokus

Today we have guest Suzy Spokus with us to share her fun ideas for creating gift card holders!


Suzy followed this tutorial to create her card, and there are some more ideas here and here if you want to gain even more inspiration.

Thanks so much for joining us, Suzy!

Check back tomorrow for our new Sunday challenge!

Thursday 9 December 2010

November Winner!

I was going to share this layout as a Studio pick, and then it came out as the challenge winner, too! The winner of the November Crafter's workshop templates is.......


SHEENA!


Congratulations, Sheena :) Drop me an email to amanda@scrapbook-101.com to claim your prize!

See you tomorrow with another Quick and Easy Christmas Project!

Monday 6 December 2010

Another quick and easy christmas project!

This time, the lovely Lisa is bringing you her quick and easy gift idea. This is what she's done:


I love making these mini gifts for people. They are so easy to do. Save your glass jars, wash and fill with sweets and add a decorative tag.
We are also planning to make some nearer to Christmade and fill with homemade Rocky Road Bars. But these ones with the sweets are great as you can make them up in advance.

I've used the Fancy Pants - Hot Chocolate paper collection which is just perfect for seasonal gifts.

Thanks for sharing, Lis!

Sunday 5 December 2010

Christmas Origami fun!

Jemma Sharrock is our guest today, and she brings us our next Quick and Easy Christmas project!


A simple origami shape with lots of possibilities! Such clever ideas :)

The tutorial is here.

See you tomorrow for our regular Sunday challenge!