Sunday, 17 March 2013

17th March- Sketch

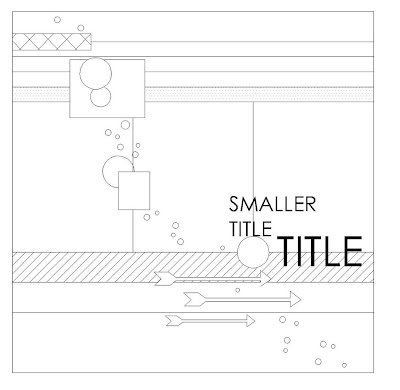
Valerie has created another lovely sketch for us this month it was inspired by Daphne's no patterned paper layout from a few of weeks ago.

Anna
It was a great sketch to use, I adapted it to suit my style, I just shrank it a bit! I loved the scattered confetti, I used mostly stamps to create mine.


Chantelle
This was a great sketch to work with - I love that you could use multiple photo's and fill the page with pattern paper - which is pretty much what I did using papers from MME.

Daphne

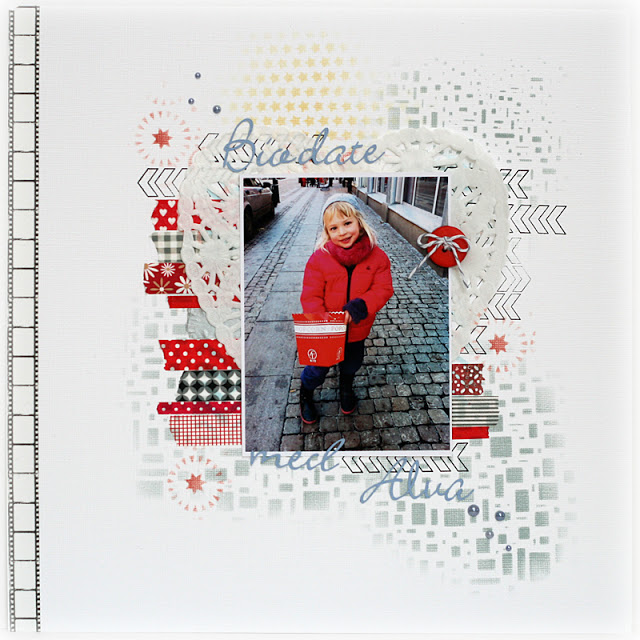
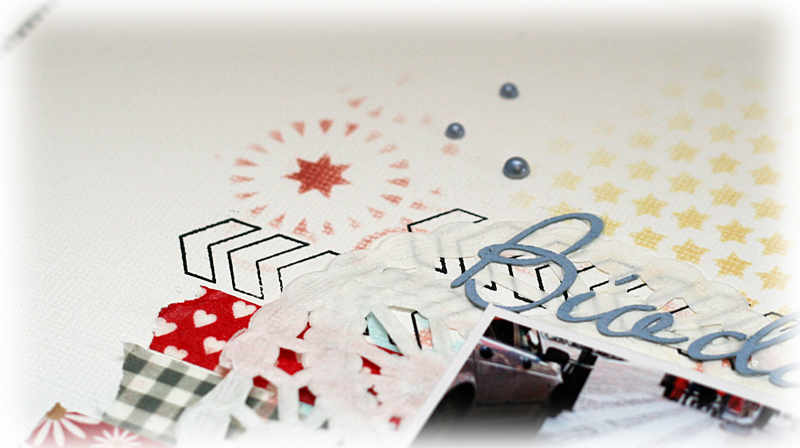
Do you remember my layout with the Washi-Tapes?! It was just four weeks ago when I did the No-PP-Challenge - and today?! Val did a sketch out of my layout and re-scrapping it is not that easy as I thought! But I managed it last minute!
 I used the new paper collection by American Crafts Dear Lizzy "Lucky Charm" - the colours fit perfectly with my shopping experience ;)

Hilde
Materials: Card stock: Bazill. Large alpha: MME Small Alpha: Cosmo Cricket. Twine & fiber: Unknown
The rest (patterned papers, border strips, washi, flags,envelope,  note stickers, brads): Teresa Collins 
Youngest kid learning the kitty to skate board. 
Details:


Kat

I loved Daphne's original layout, so I was very excited to see the sketch that Valerie created.  I modified the sketch a bit by using 4 photos, instead of 3.  I'm also not that great at the "scattered confetti effect," so I kept my scattering a lot smaller and simpler.

Katherine

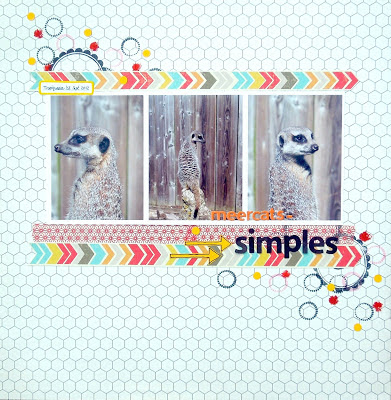
A super sketch which took me out of my comfort zone, as I don't usually fill pages up anymore :)!  I did some embossing and stitching, replaced the circles with hexagons to match with the papers, and then a few sequins amongst them.  I had a go at stitching some arrows in embroidery thread which I really enjoyed.

Petra
This months sketch was so inspiring and easy to work with. I used a photo of my son showing his "baby monkey face".


Supply:
Teresa Collins Memories collection, Silhouette, Adornit mini alphas and Kraft CS

Tessa
I love my white space, so I shrunk down the sketch and essentially placed it in the center of my page, giving me white space around the edges. I stayed true to the diagonal line of embellishments, as well as the arrows.

Guest designer - Nikki Birch
The journalling reads "Just days from being 2 years old you really are not saying as much as I thought you would at this age...but you are making all the right noises.  You like to play with cars, trucks and trains.  You like to do the sound effects, Brrrmm!!"
I made the inked lines by pressing a distress inkpad onto a craft sheet and spritzing with water, I then used an acrylic sheet approx 5mm in depth and pressed it into the ink and then onto my card stick, I did this with a few different colours, allowing the inks to bleed into each other before drying off with a heat gun.

What a great job everyone did, to get so many different layouts out of one sketch! What would you do with it? We would love to see so please link up your creations to the side bar!

Sunday, 3 March 2013

3rd March - Recipe

Today DT member Kat has set a recipe challenge for you, here's what she wants you to include in your layout:

-kraft cardstock
-at least one tag
-paint/mist
-at least 2 different kids of alphas

The design team came up with many different ways to use this recipe!

Anna

I enjoyed doing this challenge and found it easy to include the great list of products. I didn't use the kraft as my background like lots of others but included it in a big tag and a torn stripe down the side.


Chantelle

I love recipe challenges and this was a great one to see how I could combine all the elements together.  Have used the Kraft cardstock as my background and added in a Kraft tag with twine.  I've created texture using clusters of paint and mist.  And I've used some small and large alphabet stickers.

Daphne

As many others I also used the kraft CS as a background and added lots of splatters and stamped circles to it. I tripled the tags and found two very different alphas for my title!
The pictures show the huts of African villages in Guinea - my husband worked there for several months last year and I am working myself through the pile of photos he snapped while abroad! What a task, right?


Kat


Katherine

Here's my take on the recipe challenge.  I went with the kraft background, some sprinkles of paint, 2 alphas (I  love doing that anyway) and although I used a tag for my journalling behind the photo I also made my photo mounts tag shaped too.  


Hilde
Patterned papers & sprouts: Studio Calico. Kraft paper & stencil: ClubScrap. Alphas: Basic Grey (green) & SEI (red)
Dots, button, eyelets & fiber: unknown
 I have incorporated the tag as an element in the main design, and added small paint splashes all over to add interest to the plain kraft background. Modelling paste ads structure to the page and is a fun medium to work with. The journaling describes one of my chosen techniques on how to be positive in 2013, which will be a challenging year for us in many ways: counting the blessings and writing down each week the main thing to be thankful about that specific week.

Petra
This picture makes me so happy I can scrap it over and over again and goes so well with the kraft background.  I stamped the leaf randomly  over the CS and embossed  I then stamped the title HAPPY twice with two different alphas. A few details and I was done. 


Tessa
I love a good recipe challenge! They whittle down my supply choices before I start, and we all know how time consuming just choosing our materials can be! More time for scrapping, less time for stash shopping.


Guest Designer- Nikki Birch
For the recipe I used white acrylic through a stencil for the paint, the kraft and tag elements are all from a gorgeous clothes tag which I saved from a christmas gift this year, it even had the fabric embroidery and wording already printed on it and was perfect for this layout! The aplhas are a mix of Lily Bee, authentique and a diecut alpha which I overstamped with text before cutting each letter several times and gluing together for dimension.

What would you do with this recipe? Please link up your creations to the side bar!

Sunday, 17 February 2013

17th Feb - No Papers

Today we challenge you to create a layout with no pattern paper and get creative with washi tape!
Do you find it hard not to use patterned papers? What can you do with washi tape? We would love to see! The design team have come up with some great ideas to inspire you.

Anna

I enjoyed not having to use patterned paper. It makes you think about what you are adding to the page. I love using washi tape so that wasn't hard! I used my orange border washi tape under my photo and created ruffles in it to add texture, I also used more washi to add banners/flags to my page too!

Chantelle


This was such a fun challenge to complete.  I've used lots of washi tape in long strips behind my photo's and then filled in the spaces with different stamped images.

Daphne
I believe that a year ago I really would have had problems with creating a page just with Washi Tape! But today - no problem at all! Washi Tape is all over and I even could select several greens from my collection to fit the photos and page! Scary!


Hilde
Inspired by a sketch from PageMaps

Here are a few things you can do with washi tape: use it as patterned paper stripes for your background, cover chipboard with it, make your own paper buttons, make your own flags  by attaching washi to ordinary paper clips, cover office paper clips with washi.


Kat

I have been having Silhouette problems lately (just can't get my cut settings right even when I follow what the program tells me to use!), so I decided to use this to my advantage.  I made a border for my layout and knew that my Silhouette probably wouldn't cut all the way through the paper.  I was right!  So, I used a few different colors of mist to color around the edges of the page.  The mist showed up darker where the cuts had been made and ended up creating a really cool effect


Katherine

As we weren't allowed patterned  papers I had a big play around with ink and paints on my page - spritzing, then with water and running it around my page, then added some layers of washi tape and fabric too - it was great fun.

Petra

Instead of PP I went wild with different masks from Crafter's workshop, Washi tape from You Do and stamps of my own design. I am pretty happy with the matching of the cobblestone paving and the mask. The title says Cinema date with Alva.


Tessa
Between the stripes on my shirt and the stripes on my son's tie, I knew I wanted to create a striped effect with layers of washi tape for my background. To add an unexpected twist, I added the wide ombre green washi tape to bring out the vintage coloring in my photos. Who needs patterned paper when there's washi tape to play with?!


We would love to see what you can with washi tape and no pattern paper so please link up your creations!

Monday, 11 February 2013

January's Winner

The winner of January's challenges chosen at random is .....
This was her lovely entry!

Jenny wins some great goodies from Yo Do. Jenny, please email me (makeandcreate @hotmail.com) with your address and I'll pass your details on.

Thanks to everyone for joining in, it was great to see your lovely creations!

Don't forget we are back Sunday for another fun challenge!

Sunday, 3 February 2013

3rd Feb - Love

As it's now February and Valentine's day is only a couple of weeks away we challenge you to scrap about love but there's a little catch, you have to use at least 5 hearts on you layout! 


Here's what the new design team created!
Anna
 This layout is about my love of crocheting and the photos are of some of the blankets I created! 
I went a bit heart crazy, many more than five!


Chantelle
The 'love' theme was perfect for me to scrap book about these photo's - our anniversary of last year - I've included lots of different hearts - stamping, punch-out's, glitter hearts, wooden hearts and stickers.

Daphne
At least five hearts?! Hard task for me! So of course I added more than five on my layout!
My niece Ronja (14) is totally in love with nail varnish and when I visited my brother's family last December she and her sisters were sitting on the balcony and painting their nails in bright red. Even my nails got painted that day!


Hilde
By keeping the hearts small, and adding masculine elements as the moustashes, this layout didn't get too feminin, even if the hearts are pink. My oldest son before his very first prom.

Jules


A layout about love had to be about my husband, so, as he's reluctant to have his photo taken, I decided to use this one of our hands taken at our wedding.

Kat


I used a Studio Calico sketch to make my layout.  The sketch can be found here.  I don't typically scrap with a lot of hearts, but I found this layout prompt to be a lot of fun and I'm pretty happy with the end result!

Katherine

I went for lots of little hearts on my page - I stamped and punched some hearts out and used pink paper on a boy page which I think must be a 1st, but with the theme of love I figured it was an opportunity to use some :)

Petra
My daughter got a late Christmas present from some good friends who went to Disney World... As soon as she saw these glue on Disney Princess Nails she was in love ♥ To bad they fall off so soon. Anyway I managed to catch a few photos were she still have all ten nails on ♥

 
I used PinkPaislee London Market, flowers and sugar dots from YouDo, wood veener from Studio Calico, bling from Prima. Bakers Twine, Masks from Crafter's Workshop with distress ink, a Tingeling Sticker and shapes cut with the Silhouette.

Please link up your layouts in the side bar for a chance of winning a prize, we would love to see how many hearts you use for this challenge!