Sunday 19 August 2012

19th Aug- Sketch Challenge

Our sketch artiste, Valerie has another lovely sketch for us all to create with this month.
The design team had great fun playing with this sketch, all our takes are really quite different so as always there is lots of inspiration on ways to use it!

Amanda

Val's sketches are always fun and this one was no exception! I used a black pen to draw circles and then highlighted them with mists which I applied with a brush straight from the bottle. Inspired by the chevron pattern I used a stamp to add a little chevron love around my page :)


Anna

I had great fun using this sketch, there's loads you can do with it! It turned out quite differently in the end but you can still see it in there! I found a chipboard flower in the back of a draw which I took my inspiration from. I used it as a mask, then a stamp and then added it to the page too!

Christina


Loved working with the sketch! It was so flexiable. I made the circle smaller and just layered a bunch of pretty papers on top. Even the butterflies are layered. The journaling pulls out from behind the picture.

Daphne

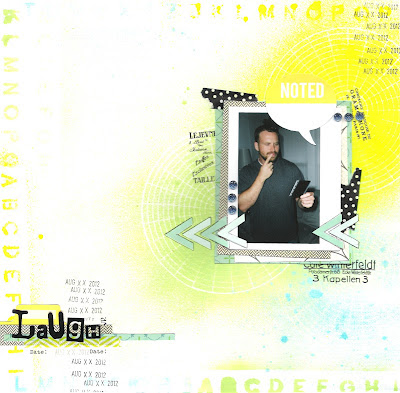
My version of Val's sketch is mirrored just because I like people looking into the page instead out of the page! For the background I used the back of the sun I cut out from American Craft's Shoreline paper and just staggered it a bit so the misting shows off properly.

Ellie
Keep it super simple but then again that's what I love to do. I loved this picture & had it on my desk for a while & was determined to scrap it.
Emi

I really liked this sketch!
Felt so free with it. :)
This one is about my love-coffee!
And about drinking coffee, talking and having good time with friends :) Thank you Val for the sketch!

Jules
I flipped the sketch and used the circle on the background paper for the circle on the sketch. I originally had the title in the top right, following the sketch, but the lines on the background paper were crying out to be journaled on, and the words 'hurry up!' jumped out of the journaling as a title so I went with that instead! 

Kat
I had a lot of fun with this sketch!  I decided to play with a bunch of my mists that haven't been getting much attention lately to create the circle background.
Katherine
I love working with sketches - especially Val's.  The thing my kids love about hot weather is having water fights, and this quick snap caught them in action.  I made my circle into pie chart (or trivial pursuit) shape and then used my silhouette to add words and stars.

Kim
I flipped the sketch upside down to create this layout using a photograph of myself at age 13. I absolutely LOVE this sketch and think I will use it again and again. The design is absolutely brilliant, and I found everything fell into place really easily. 

Petra
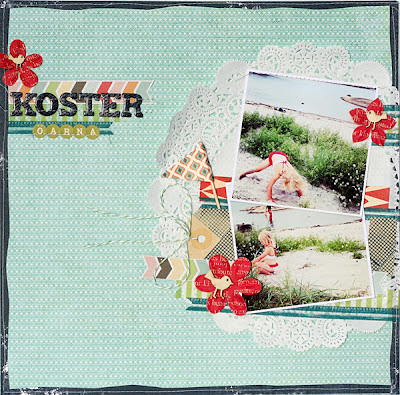
A bit traditional perhaps. My only deviation from the sketch is that I used 2 square photos instead of 1.
I found this gigant Doily in a Home Style shop and couldn't resist... I guess it should really be used for baking cakes but I was baking a page instead.


Valerie
I didn't stray very far from the original sketch but I did shrink it down a bit. 

Guest designer Katie Scott
Sketch:  I wanted to use a 5x7 photo for this sketch and this photo of my daughter with an ice cream cone was the first one I found so I decided to use it.  I picked the craft textured cardstock as the circle because it reminded me of an ice cream cone.  I decided to ink the edges, something I don't normally do but have been trying lately, to make the circle stand out a bit from the busy floral print.  This sketch gave me a chance to have fun picking random papers and embellishments with colors that worked together but I wouldn't normally use together - hot pink, orange and purple!
Journaling & Title:  This was another page that came together easily but that I didn't have a story that was obvious.  Since this photo was taken a few years ago, I vaguely remember that my daughter had been crying and I was trying to cheer her up with ice cream - you can see that her smile isn't huge and that her ice cream is melting a bit.  Again, I found a great quote by searching "ice cream quote" in Pinterest:  "You can't buy happiness, but you can buy ice cream and that's kind of the same thing."  The title came from this quote.  I also added a bit on the big horizontal banner:  "There's nothing like an ice cream cone on a summer day to cheer up this sweet girl."

Thank you so much to Katie for joining in with us this month, it's been lovely having your creations with us this month Katie!


Don't forget to link up your entries for this months challenges for a chance of winning two sets of Teresa Collins' clear stamps. We would love to see what you do with this sketch!

Monday 6 August 2012

Blog Hop Winners

Just popped in with the list of the Blog Hop winners. I know some of you won't be followers of our DT blogs and I didn't want you to miss out on your prize so thought I would post them here!

Congratulations to....

Daphne's winner is -Mel J

Katherine's winner- Wrightboysmum

Valerie's winner- Brenda D

Anna's winner- Candace

Jules' winner- Brenda

If you are a winner please visit the corresponding blog and it should have contact details on the there for how to claim your prize!

Thanks for joining in with the blog hop, hope you enjoyed it!

Sunday 5 August 2012

5th August- New Technique

Thanks to everyone who joined in with the Olympic Blog Hop, hope you enjoyed it! I think I can say we all loved reading all your comments and lots were about the Olympics too which were great to hear! Some of the winners are already posted on our own blogs but once all the winners have been picked I will post the list on here just to make sure no one misses out on calming their prize!


We have a new challenge for you today, the challenge is to: 
Use a technique you’ve never tried before on a scrapbook page.


We have the brand new design team joining in today so you now have double the amount of inspiration! They have done a great job with this challenge, here are our creations!


Amanda

The new technique I decided to try on my layut was 3D decoupage. I had this wonderful old photo of my great, great grandmother and thought it would work really well with this vintage style decoupage set from Ruby Rock-it.
I used the decoupage layered over a few scraps of vintage paper, and added my photo. I couldn't find the right letter stickers to complement the page so I decided to try and cross stitch my title on there! 

As I was stitching I realised I'd never done cross stitch on a page before, either, so that was new technique number two :)

Anna
 I struggled to think of a new technique as I like trying out new things so I had a look on Pinterest and that inspired me! The new technique I choose was paper quilting, I like the effect it works well, it also looks great with the double sided papers as you see both sides!


Christina
I tried two new techniques with this layout. A few months back - I saw someone using their regular shape punches to make borders with extra interest. I decided to give it a try with my postage stamp punch. I also have always wanted to do a 12x12 layout with a picture that takes up the entire page. I don't have a 12x12 printer so my only other option was to print a bunch of 2x3 photos which took up the same amount of space and gave me the same look. :)

Daphne
A new technique?! Me? Oh well... why not?! Last week I found my old set of watercolours in the back of the drawer and I instantly had to use them! I draw some circles onto the card stock and filled them with ombre-style rings! It was very therapeutic ;) And because I love bright colours in every way my layout is about Chasing Colours with my camera!

As Amy Tangerine uses watercolours on her 'Sketchbook' papers I could add some of her die cuts easily and also used a stamp from the same collection!
Ellie
For me the technique I used was actually scrapbooking a large picture this one is 7 x 11. How many of us have those 8x10 pictures of our children and wonder what could I do w/it besides framing it. That is where this came in.
I was so excited about getting over my fear that I actually started to pull out the larger pictures I have!

Emi
I really like using sprays on my layouts but I've never made whole background with them.
I put doily lace, alphabet and few old scrap stuff on white page and just sprayed it.

It's really interesting method to get unique background. 


Jules
I've seen a trend for oversized photos recently, and as it's something I've never tried before I thought it would be perfect for this challenge - the largest photo I've scrapped before was 7x5", this one is 12x8"! I deliberately picked a photo that had white space at the top, so I could add my title directly to it. 

Kat
The new technique that I used was stitching a title.  I traced my word in pencil first, then used a thumbtack to poke holes along the writing.  I used baker's twine to weave it through the holes.  Here's a close-up:
Katherine

A new technique on a page, after a little flick through Scrap365 I noticed a page that had used alcohol inks on acetate....so this is my first attempt at using alcohol inks on a page.  I started by adding the blue and a little bit of blending solution and brushing it across the page, and then added some drops of blue too.

Kim
Here's my first LO for August. I used a tissue paper casting technique I have used on cards but not on a layout until now. This was done by applying wet layers of tissue paper over a rubber stamp, and gently pressing down to cast the image into the tissue paper. After the paper dries you are left with a fabulous texture that resembles plaster and can be coloured with sprays to coordinate your project.

Petra

My technique was to print the photo directly onto the pattern paper, something I have always wanted to try since I saw it on the Dear Lizzy blog. I chose a pale dotted paper by Bo Bunny. To fit it into my printer I had to cut up the page and so I used Washi tape to stick the page back together. 

I also printed the journaling onto the same PP. The journaling {in Swedish} is about my 4 year old dear daughter’s obsession with clothes. The title is Clothes {kläder in Swedish}

Tessa
I challenged myself to learn how to collage a girl. Using the book Collage Couture as a guide, I made a girl to accompany photos of myself and a new necklace. She was fairly easy to make, especially since only the clothes are hand-drawn. I cheated a bit and used a template for the body. I hope to one day be able to draw all of the elements on my own.


Valerie
For my project I stamped a background. While I own many stamps and love the way a stamped background looks when I see it used on projects, I've never used the technique on one of my own layouts. Using a clear stamp definitely made the process easier!


And please welcome our guest designer, the lovely Katie Scott, who is joining us this month! Here's her take on the challenge:


Misting & Stencils:  I took an art journaling class at my local scrapbook store and had the chance to try some alcohol ink misters (maybe Ranger but I'm not sure) with the stencils from My Crafters Workshop.  I tore the page with the lime green misting out of my art journal and decided to use it as a background for a scrapbook page.  The intense bright green sort of matched the color the grass in these photos and there were circles and arrows in the stencil so I thought it would work with these backyard archery photos.  Much of the misted stencil got covered up when I added my photos, so I decided to try another new technique on this same page.


Puff Paint:  I recently got into an online scrapbooking discussion about the neon trend and someone joked that all we needed now was to add the puff paint to our scrapbook pages; she made the comment as a joke but I had some unused puff paint in my scrapbook stash and decided to add a burst of red to this page.  I made a large circle, some dots and I circled around part of the journaling with the puff paint to create a visual triangle.  When I circled the journaling I accidentally covered up part of the words, so after the puff paint dried, I went back over the journaling with a sharpie and the sharpie worked great on the puff paint.  Since this page was about my kids, I thought the puff paint added some energy and fun to this page.


Journaling:  I didn't have a huge story about our backyard archery set that I wanted to tell on this page, so I searched Pinterest for a quote about "target" and didn't find much; then I tried "aim" and found this quote by Michelangelo and loved it:  "The greatest danger for most of us is not that we aim too high and we miss it, but that we aim too low and we reach it."  And at the bottom I added "Awesome archery set - Summer 2012."  (We've been watching Archery in the Olympics and decided to give it a try - it is so much fun!)

Supplies:  My Crafter's Workshop Stencil; Ranger Alcohol Ink Spray Mist; Puff Paint; Sharpie; DCWV Paper; Scenic Route Paper.

______________________________________
Amanda has kindly donated the prize for this months challenges so we have these 2 sets of Teresa Collins clear stamps up for grabs!


Just link up your entries for a chance to win them!